macOS Sonoma arrived on Macs in September 2023. Many people have installed Sonoma and love it, while others have installed the updated only to regret it later. Perhaps you’ve discovered that an app you rely on no longer works or is buggy, maybe you hate one of the new features, or you are frustrated that your Mac can’t take advantage of all the new features.
Another issue is that sometimes when Apple updates the Mac operating system with new features, users encounter problems with the latest version of Sonoma. Our advice is usually to wait a few days or weeks before installing a major update for this reason (although sometimes it’s recommended that you install it straight away if the update is necessary for security reasons.)
Luckily it is possible to revert back to the previous version of macOS before the update, but, unfortunately, it isn’t as simple as finding the older version of the Mac operating system and reinstalling it. Apple doesn’t make it as easy as it could and it can mean you lose some of your data.
Maybe you need to run an older version of the macOS on a Mac you are using to test apps as part of your job. We have a separate article that looks at various ways to downgrade to older versions of macOS. You may also want to look at other ways to install the older version of macOS, such as installing it on a separate volume (also known as dual booting) or running it on a separate drive.
We’ll run through the steps to downgrade your Mac from the latest version of Sonoma to an older one, or from Sonoma to Ventura, in this article. If you want to downgrade from a beta version of macOS we have a separate article dealing with downgrading from a beta version of macOS.
Foundry
How to revert a macOS update
If you want to revert to an older version of Sonoma after installing an update, perhaps because something in the update is causing problems for you, it is possible and can be relatively stress-free if you have a backup from before you upgraded. With such a backup, all you need to do is wipe your Mac and recover your backup with the older version of macOS Sonoma intact.
If you don’t have such a backup you will need to backup the data on your Mac that you don’t want to lose using a tool other than Time Machine. Apple’s Time Machine is no good here because when it backs up your Mac it will back up the current version of macOS as well, and when you recover your Mac from the backup you’ll recover that version too.
Luckily there are plenty of alternative backup options, such as Acronis Cyber Protect Home Office, Get Backup Pro, Carbon Copy Cloner and ChronoSync, which we cover in our round-up of the best backup software for Mac.
How to downgrade from Sonoma to Ventura
Here’s what to do if you want to revert to Ventura after installing Sonoma.
Chances are you arrived on this article because you have updated to Sonoma and regret it. There are a few methods you can use to downgrade from Sonoma to Ventura all of which we cover below. For example, if you have a Time Machine backup from before the upgrade you can revert to that – but be sure to make a copy of any new files or photos you have added since upgrading first (and don’t use Time Machine for the back up because you will just recover Sonoma along with your files).
You could also reinstall macOS Ventura using a bootable installer, but you will have to wipe your Mac first.
We’ll look at the various options and how you can downgrade from Sonoma to Ventura below.
Before you begin: Back up your Mac
If you have a Time Machine backup from before you updated your Mac to Sonoma that was made recently enough for you not to have a load of new data you need to back up you can move to the next section (or just make an external copy of the files and data you have created since you updated). Even if your Time Machine backups happen daily you will find older stored backups on your external hard drive, so just find one from before you updated (you will need to know when you made that update of course!)
However, if you don’t have such a backup you will need to create one before you start the process of downgrading your Mac. The reason for making a backup is that during the downgrade process: you will completely wipe your hard drive–so if there is anything you don’t want to lose make sure you have a copy of it.
It’s important not to use Apple’s Time Machine software to make this particular backup. This is because if you recover from a Time Machine backup made in macOS Sonoma you will recover Sonoma too (and likewise for whatever macOS you are running). Instead back up any recent changes and documents using another backup tool. For example, you could try Carbon Copy Cloner (which has a free 30-day trial or costs £52/$49.99), and doesn’t make you back up the operating system. Check out our recommendations here: Best backup software for Macs. We also have advice about How to back up a Mac.
It’s possible that you could get by without any backup at all if all your files are stored in iCloud. Just be aware that iCloud is not a way to back up your Mac because when you delete certain files from your Mac you may also be deleting them from iCloud. You should also make sure that everything you want is in iCloud–we are so used to working in the cloud that we often assume that things are there when in fact they are on our Macs (speaking from experience here!) See: How to use iCloud to back up your Mac.
Also make sure you make a copy of any photos you wouldn’t want to lose, even if you use iCloud Photo Library, there are some things that are impossible to replace.

Option 1: Downgrade macOS using a Time Machine backup
If yoy have an older Time Machine backup from before you upgraded this will make the downgrade process a lot easier. With your pre-Sonoma Time Machine backup in hand you can recover your machine from before the update and then copy back any files you created after you installed Sonoma.
This is our preferred method because Time Machine backs up your settings and apps so that when you recover from that backup everything is exactly the way you are used to it being, which can be comforting. As long as you have old backups you should be able to go back to a date before your upgrade and recover that version of your Mac. Just remember that anything you have done since then will be lost because you’ll wipe everything on your Mac as part of the process, so if you skipped the backup part of this tutorial go back and do that.
Here’s how to recover the old version of macOS using Time Machine:
- Plug your Time Machine disk into your Mac.
- Restart your Mac.
- If you have an Intel Mac hold down Command + R until the Apple logo appears. If you have an M1 or later Mac you need to press and hold the power button until the Options menu comes up.
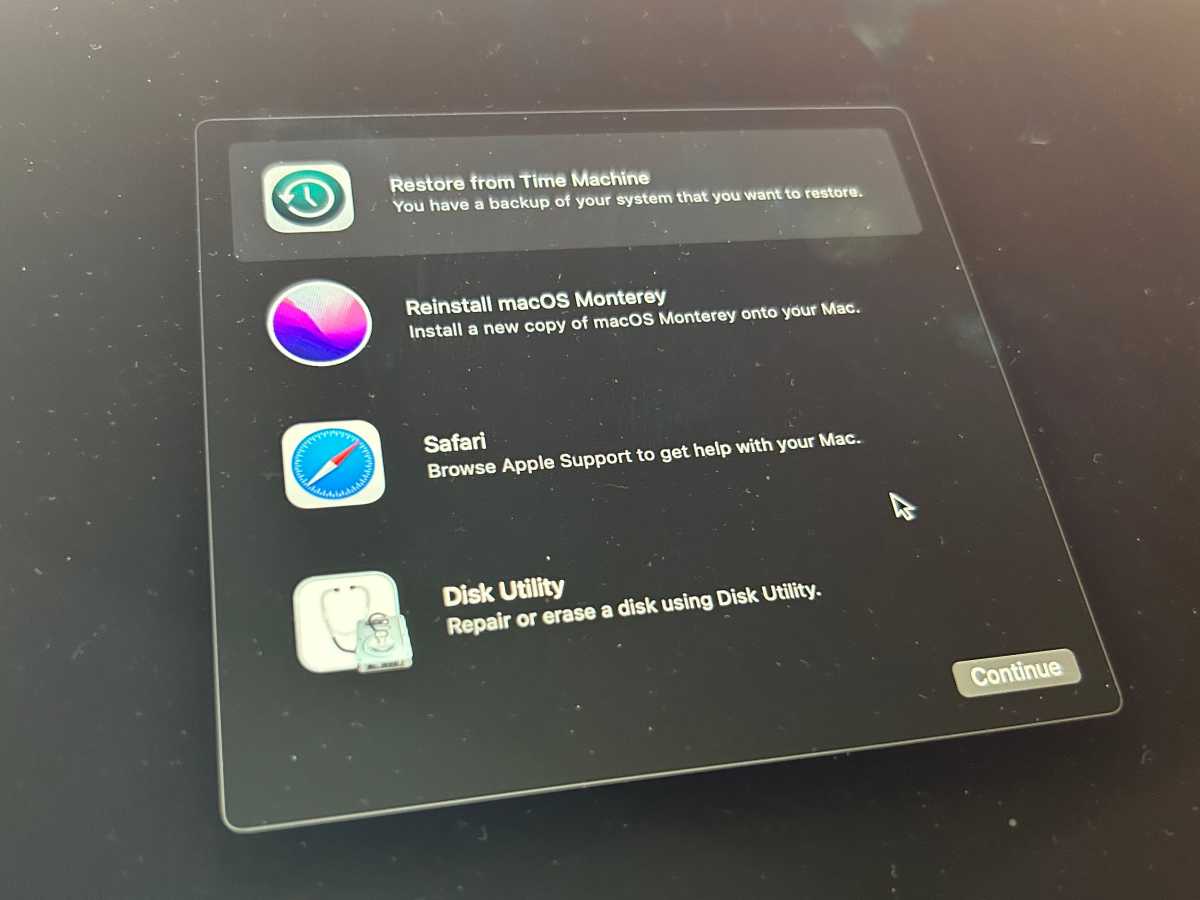
- When the options appear on the screen, choose ‘Restore From Time Machine Backup’ and click Continue.
- The next screen will show the words Restore from Time Machine, click Continue again.
- Next, select your Restore Source – this should be your backup drive.
- The next screen shows all your backups over time, pick the last one you made prior to updating to the newer version of the Mac operating system. (You can see which version of macOS the back up was made in).
As we said above, if you are on an M1 or M2 Mac you won’t be able to revert to a version of macOS before Big Sur, that’s because Big Sur won’t run an ARM-based processor like the M1 and M2.
Once you have restored the older version of macOS you can recover the files you created since from your separate backup.
But what if you don’t have a Time Machine backup?…
Option 2: Reinstall an older macOS via Recovery mode
Depending on the age of your Mac there might be an option to recover the original version of macOS it shipped with using macOS Recovery.
If your Mac shipped with Sonoma installed you won’t be able to revert to something older than that.
Follow these steps to reinstall the version of macOS your Mac came with, or one that is close to that:
- Turn off your Mac.
- Restart it while holding down Shift + Option/Alt + Command + R to enter Internet Recovery Mode (make sure you are connected to the internet).
- Choose the Reinstall macOS option.
- Click Install.
This may allow you to install the operating system that your Mac shipped with. Unfortunately, when we tried this method we were unable to recover an older version of macOS, it seems that it works only for some Macs.
Note that this method will erase your Mac, so do make sure you have a backup of important files.
Option 3: Reinstall an old version of macOS with a bootable installer
If you don’t have a backup or the Internet Recovery method above doesn’t work all is not lost. You can install Ventura, Monterey, Big Sur, Catalina or an older version of macOS on your Mac. You will need to wipe your Mac first, which could mean you will lose your data if you don’t back it up. Remember backing it up with Time Machine won’t be useful here as you would recover Sonoma along with your data.
Get the installer

Foundry
The first stage of this method is to get the installer for the version of macOS you require, with the prerequisite that your Mac needs to be able to run it. See: macOS compatibility–the versions your Mac can run.
We have links to some recent versions of macOS below so you can download the one you want.
- To start you need to grab the installer of whichever version of macOS you want to install from the Mac App Store using the links above. If you want an older version see this article: How to download old versions of macOS. When you click the link above it should take you directly to the Mac App Store, if that doesn’t happen close the Mac App Store if it is open and make sure you are using Safari.
- Click on Get.
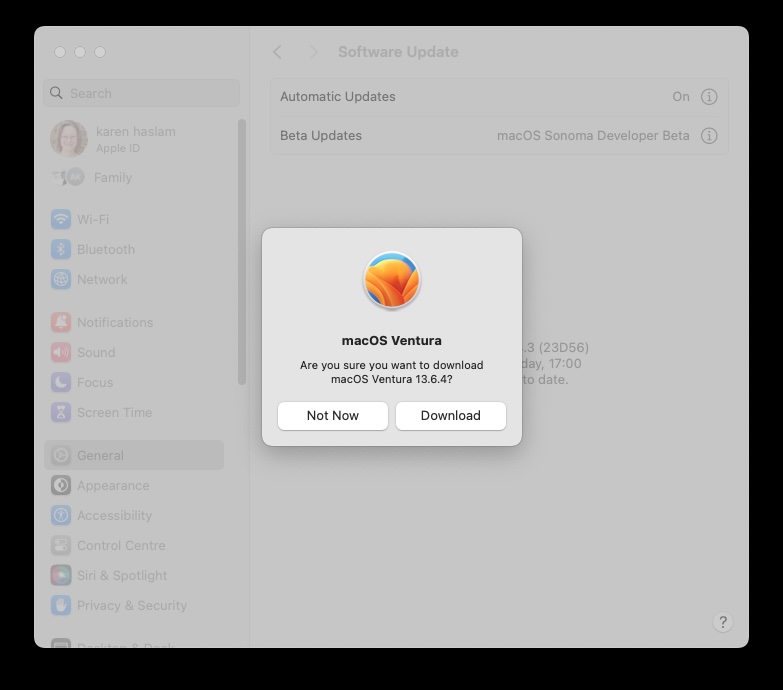
- The Software Update window from System Preferences will open and you should see a pop-up overlaying it with the version you want to download. Click on Download and confirm that you want to download the software (you’ll also see a warning that you are downloading an older version of the OS, ignore it.)
- Once it’s downloaded DO NOT click on Open – you don’t want to install it yet.
Create a bootable installer

Foundry
You won’t just be able to install Ventura over Sonoma (or any old version of macOS over a newer one) in order to install an older version of macOS on your Mac you have to make a bootable installer that includes the installation files.
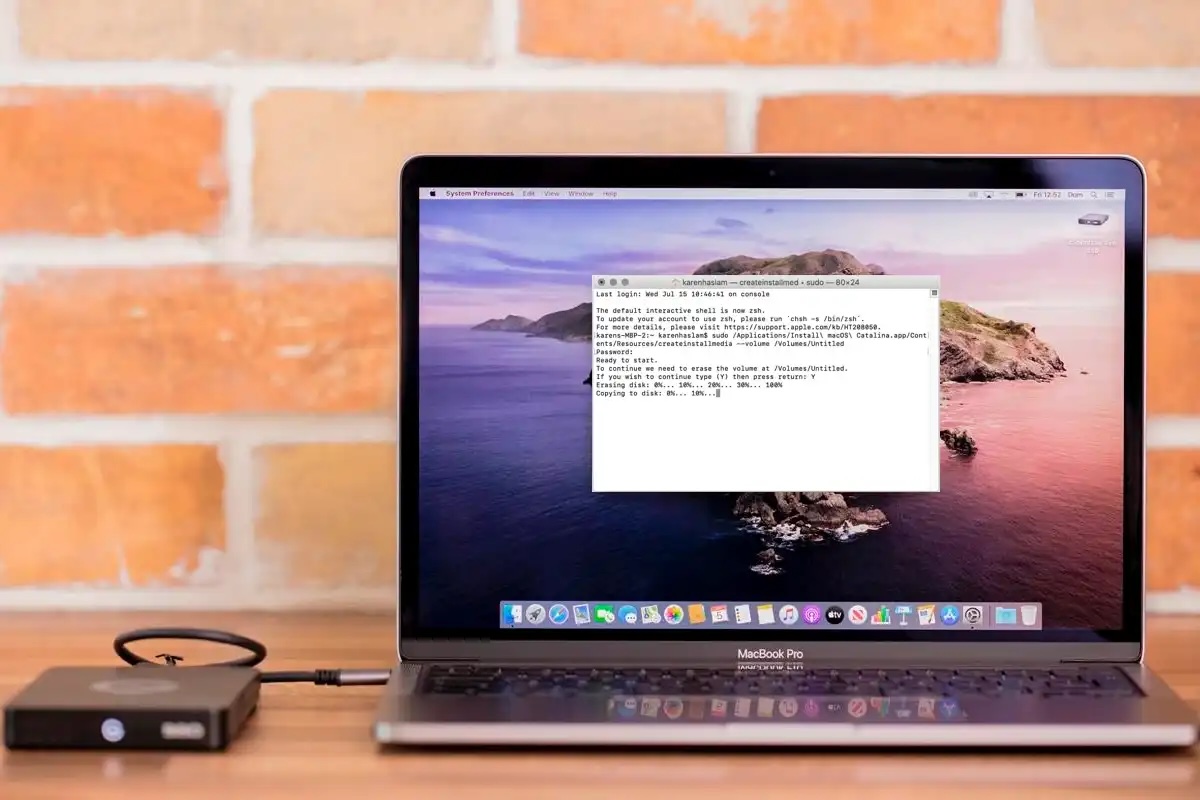
To make a bootable installer, from which you can reinstall the older macOS, you will need a memory stick with at least 15GB space but we’d recommend more. You’ll need to reformat that drive and prepare it in Disk Utility and then use Terminal to input the createinstallmedia command for the version of macOS you are installing.
In the case of Ventura this is:
sudo /Applications/Install\ macOS\ Ventura.app/Contents/Resources/createinstallmedia –volume /Volumes/MyVolume
You will need to replace MyVolume with the name you have given to the drive you are using as the bootable installer.
We recommend that you follow the steps outlined in this article: How to create a bootable installer of macOS to create your bootable installer. You will find all the createinstallmedia commands in that article.
Use the bootable installer to downgrade your Mac

Foundry
Now you have your bootable installer you should be able to install the older version of macOS on your Mac using it.
- Connect the bootable installer to your Mac.
- Open System Settings and click General > Startup Disk.
- Choose the external drive with your installer as the startup disk and click Restart.
- Your Mac will shut down and restart in Recovery mode.
- You will need to connect to Wi-Fi because your Mac will need to connect to the internet during this process. Access Wi-Fi settings from the Wi-Fi menu.
- Select Reinstall macOS from Utilities.
- Click Continue.
Troubleshooting issues when downgrading your Mac
These things don’t always go smoothly so we are running through a few issues you might encounter below.
What to do if booting from external media doesn’t work
If you are using a Mac with a T2 Chip then you need to ensure that you enable booting from external media or this will not work. To do this you need to access Recovery Mode and then choose Startup Security Utility from the menu. Here you will see a number of options including those for Secure Boot and those for Allowed Boot Media. It is in this second section that you will find Allow booting from external or removable media. You will need this selected to boot from a bootable drive.
What to do if the old macOS won’t install
If the above doesn’t work you may need to completely wipe your Mac before reinstalling macOS from the bootable drive.
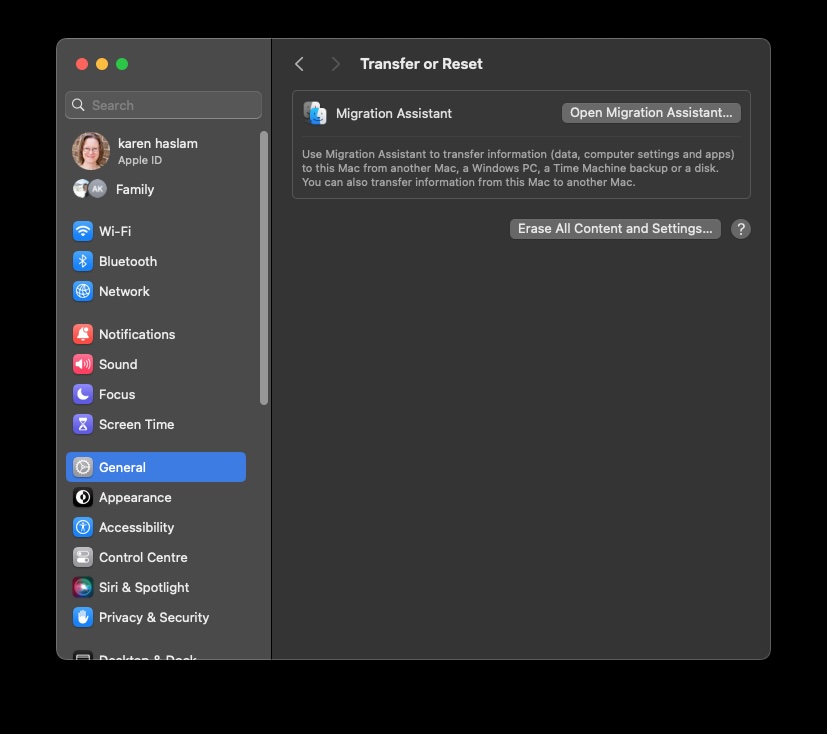
We explain in detail how to erase a Mac in this article: How to erase a MacBook or Mac: restore to factory settings and we advise that you follow that tutorial. If you have a Mac with T2 chip, or an M-series Mac erasing your Mac is very simple thanks to the Erase All Content And Settings option. This setting used to be found in the menu of System Preferences but with the arrival of System Settings it’s now located in System Settings > General> Transfer or Reset.

Foundry
If your Mac is older, or you aren’t running Monterey, you will need to erase your Mac following the steps in our tutorial on wiping a MacBook or Mac. We recommend that you follow that tutorial as there are a lot of steps you should take to ensure that you don’t create more problems for yourself.
How to avoid problems when you downgrade macOS
Reversing an upgrade carries with it a number of wrinkles and pitfalls.
Most of these are due to changes in file formats and settings between versions of the OS. So, for example, if you create a document or work on a file in a new version, whether it’s a beta or full release, of macOS and then try and open it in an older version, it may not work.
To mitigate this, it’s wise to export any documents you’ve created or worked on in the newer OS in a standard file format. So, for example, if you use Scrivener or Ulysses, export documents as RTF files. That way, if the native files don’t survive the reverse upgrade, you’ll be able to re-import the RTF files.
Take screenshots of preferences and settings
Whenever you perform a clean install of macOS, which is what you’re doing here, it’s a good idea to take screenshots of any custom settings you’ve created in apps or in System Settings (or System Preferences). That makes it easier to re-create them later.
You should also make a note of user account and password details for anything you’ve set up while running the new version of the OS. If you don’t use iCloud or Chrome to synchronise bookmarks, it’s a good idea to export those and make a copy.
And unless you’re using the migrate data option outlined above, you’ll also need installers and license codes for apps you use. If those are downloads from the Mac App Store, you can just re-download them from the Purchased section in the App Store. If not, make sure you can download them from the vendor’s website. If you don’t use a password manager to store license codes, make sure you’ve got a copy of them before you start.
Synchronize
If you use Dropbox, OneDrive, Google Drive or any other form of cloud storage, make sure your data is in sync before you start the process of reversing an upgrade. It’s easy to forget that the files that live in your Dropbox folder, for example, are local files and that while synchronization is frequent, the loss of an internet connection will prevent it and you could have files in your local folder that haven’t yet been copied to the cloud.
Clicking on the cloud service’s logo in your menu bar should tell you whether synchronization completed successfully and files are up to date.
If you use Gmail, iCloud mail or any other IMAP server for your email, make sure it’s up to date and any drafts you’ve composed recently have been synchronized. If you use a POP3 account you’ll have to manually back up the mail database and restore it after you reverse the upgrade. Or, if you only have a few messages you need to keep, forward them to a Gmail account – you could set one up especially for that purpose.


