Summary created by Smart Answers AI
In summary:
- Macworld explains how connecting external monitors to your Mac can significantly boost productivity, covering various port types including USB-C, Thunderbolt, and HDMI.
- Different M-series chips support varying numbers of displays natively, with M1/M2 Macs having limitations that DisplayLink docks can overcome.
- Success requires identifying correct cables and adapters for your specific Mac model, with setup involving System Preferences and display arrangement configuration.
The more screen space you have the more efficiently you work apparently. So why not connect a second (or even a fifth) display to your Mac? In this article we help you identify which adapter you need to plug your Mac into an extra, external screen (or even more than one), and how to get everything set up.
While it’s generally easy to set up an additional screen, there are a few issues that might cause your display not to be detected by your Mac, so we will also offer solutions for these problems below.
It is also possible to use an iPad as a second screen. This may suit you if you don’t already own an external screen, but note that you do need a supported Mac and iPad. We look at how to use your iPad as a screen for your Mac in a separate article, along with which iPads and Macs support the feature. Apple has added the ability to use one keyboard and mouse with two Macs, or a Mac and iPad, which could suit your new way of working. To find out more see: How to use the same mouse and keyboard with two Macs.
Another thing to bear in mind if you are hoping to add two external displays to your Mac is that while some Macs can support up to five additional displays, the plain (non-Pro or Max) M1 or M2 Macs and MacBook Neo support only one additional display—although there is a workaround, read: How to connect two or more external displays to Apple M1, M2 and Neo Macs. You may also be interested in how to use an old iMac as a second display.
How to connect an external monitor to a Mac
This is one of those things that should be easy, but because over the years Apple has changed the ports on Macs it can be difficult to know what connectors you actually need in order to connect a monitor to your Mac. That’s even before you have studied the ports on the back or the display to work out what connector is required there.
Luckily once you know what wire you need to connect your MacBook to your monitor it should be plain sailing.
The steps are relatively simple, but as you will see the first step is the hardest!
- Identify which Apple adapter and cable you need to connect the Mac and the monitor by following the guidance in the Which Port section below.
- Plug it in.
- Open System Preferences > Displays.
- Click the Arrangement tab.
- Do not select the Mirror Displays tickbox (unless you want the second screen to show the same content as your original screen).
- Drag the illustrated displays into the arrangement you require.
- A white menu bar will be shown at the top of one of the screens. Drag this white bar to the screen you wish to be dominant.
- If you want to mirror the display on both (or multiple) displays go to System Preferences > Displays > Arrangement and choose Mirror Displays.
- You can also select ‘Show mirroring options in the menu bar when available’ and you will see a status menu in the menu bar making it easier to turn this off and on again.
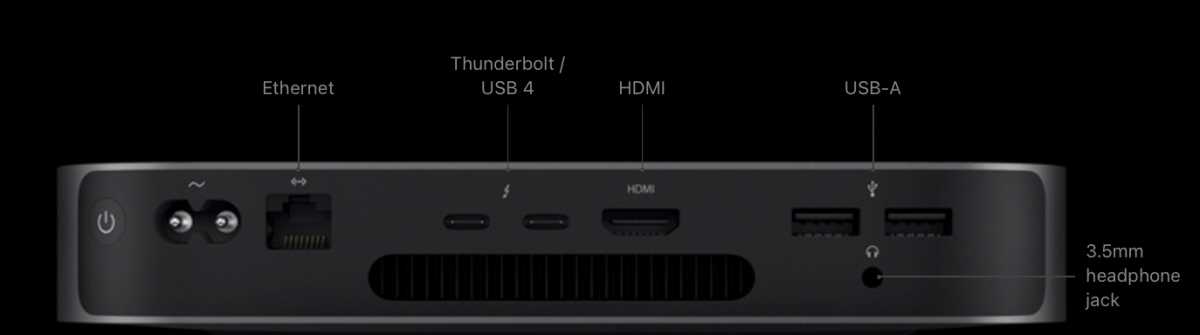
The options are a little different if you are attaching a desktop Mac, like a Mac mini, to a monitor as it doesn’t have its own display. If you are adding a second monitor to a Mac mini you will see something like this:
As with the options for connecting a monitor to a MacBook, if you connect more than one monitor to a Mac mini you will notice the white block at the top of one of the displays. You can click on this and drag it onto the display you wish to be the main display.
You can also adjust the position of each display to reflect how they are positioned on your desk, so that when you drag your mouse from one screen to the other you know where it will appear.
If you have an Apple TV, or any TV that supports AirPlay, you can also use AirPlay to send a second screen output to your TV screen. Here’s how to do that: How to view your Mac screen on a TV.
If you are using your Mac with an external screen and want to close the lid on your MacBook read: How to use MacBook with lid closed, stop closed Mac sleeping.

Now that I’ve arranged the displays this way, I can move my mouse pointer to the second monitor just by moving it up. The transition is instant.
Which port has my Mac got?
As we said above, the hardest part of connecting a display to your Mac is working out what cable you need to plug into your Mac and the monitor.
The cable you require depends on the model of Mac and the type of monitor. Apple has implemented quite a few different port types over the years, and your Mac desktop or MacBook might feature any of the following: HDMI, USB-C, Thunderbolt 2, 3, 4 or 5, or Mini Display. We’ll help you identify which port you have below.
HDMI
All today’s MacBook Pro models ship with an HDMI video port that is dedicated to connecting to external displays or projectors, starting with the 14in and 16in MacBook Pro introduced in 2021. The Mac mini and Mac Studio also host an HDMI port. HDMI ports are often found on TVs, making those Macs a popular choice for those setting up a media centre PC.
Macs with an HDMI port include:
- Mac mini
- 14in MacBook Pro
- 16in MacBook Pro
- Mac Studio
You’ll also find HDMI port on some older Mac mini models and the MacBook Pro from mid 2012 to 2015.
Thunderbolt 3, 4 and 5 / USB4 / USB-C
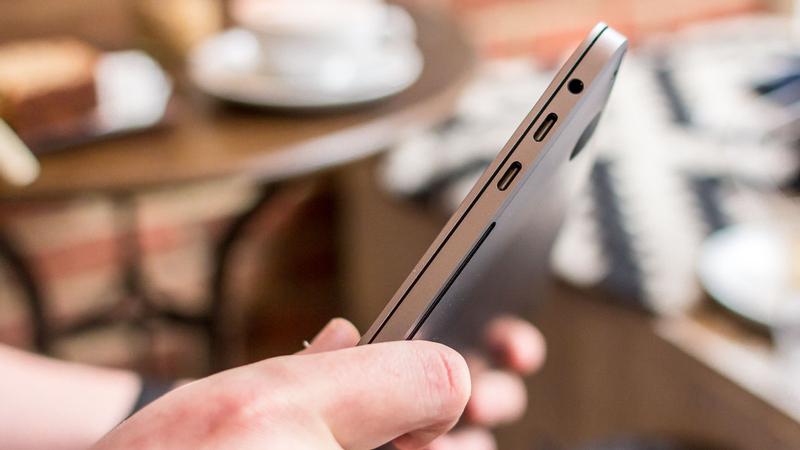
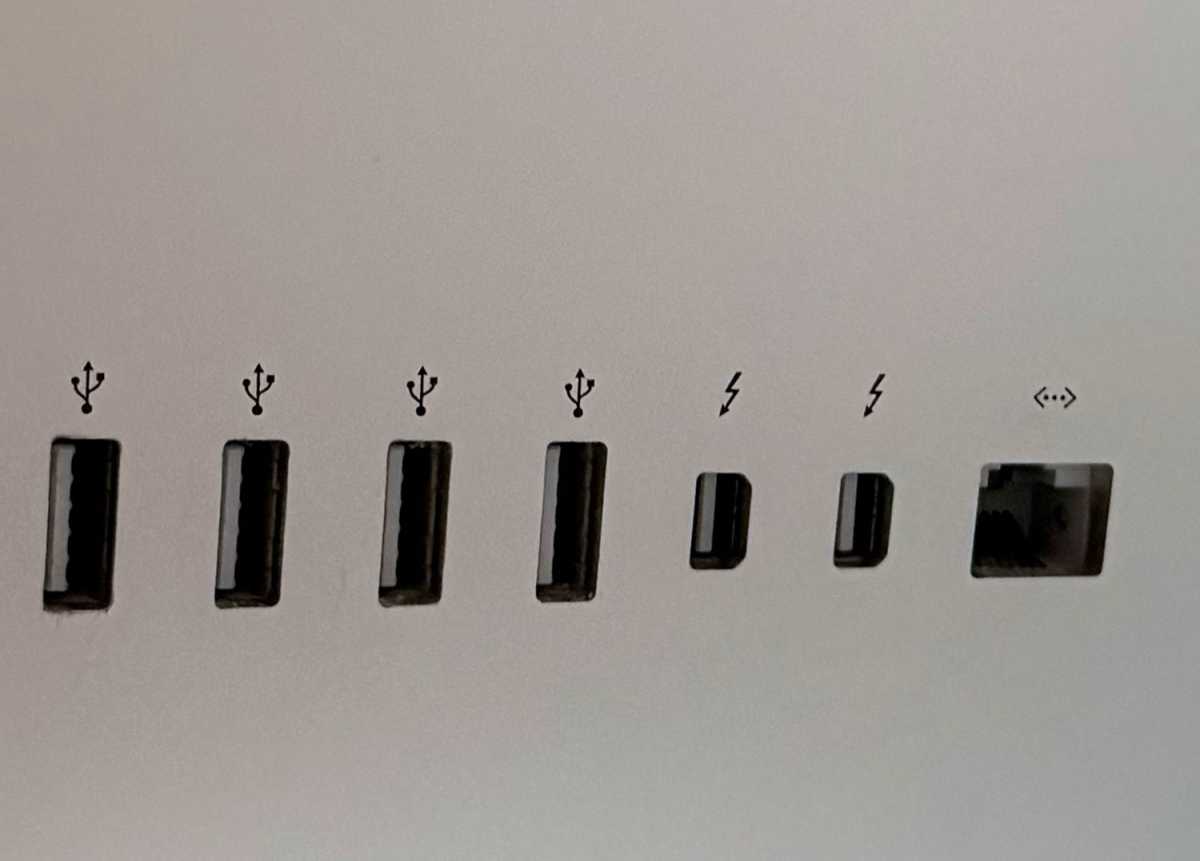
USB-C is the charging and data port found on most modern devices. It’s a small, elongated oval shape with rounded, symmetrical ends. It’s more capable than the older rectangular USB-A port with a cable that must be inserted one-way only—and always the other way than you first try it. USB-C is reversible so the cable can go in either way up, which is much more convenient.
Thunderbolt versions 3, 4 and 5 are a supercharged version of USB-C, with a bandwidth of between 40Gbps (Thunderbolt 3 and 4) to 80Gbps (Thunderbolt 5) compared to USB-C’s 5GBps to 10GBps. Each is backwards compatible with USB-C and looks and acts in the same way, so with them you will be able to use any USB C-equipped monitor, or a Thunderbolt monitor, with your Mac.
You’ll be able to use a USB-C data cable to connect your Mac to your monitor, but it must support DisplayPort Alternate Mode (DP Alt Mode), meaning simple USB-C charging cables might not suffice for connecting to a monitor. The minimum recommended data speed is 5Gbps (USB 3.1/3.2 Gen 1), though a 10Gbps (USB 3.1/3.2 Gen 2) or 40Gbps/80Gbps (USB4/Thunderbolt 3/4/5) cable is better for higher resolutions, faster refresh rates, and data transfer. For suitable monitor/data USB-C cables consult our reviews of the best USB-C and Thunderbolt cables.
The older Thunderbolt 1 and 2 connections (found on some Macs from 2011 to early 2016) are a different shape entirely and less capable than later Thunderbolt or plain USB-C. We’ll go into more detail on those older varieties later.
Macs with a Thunderbolt 3 (USB-C) port include:
- 13in MacBook Pro (from 2020)
- MacBook Air (from 2020)
- 24in iMac (from 2021)
- Mac mini M1 (from 2020)
You’ll also find Thunderbolt 3 on Macs from around the end of 2016 and onwards.
As with Thunderbolt 3 , Thunderbolt 4 shares the same port as USB-C (and USB4, which we discuss next). The port looks identical to the Thunderbolt 3 port (above) and is completely backwards compatible.
Apple
The big benefit of Thunderbolt 4 is it supports two 4K displays or one 8K display from a single cable connection.
Macs with a Thunderbolt 4 port include:
- 14in MacBook Pro (from 2021)
- 16in MacBook Pro (from 2021)
- Mac Studio (from 2022)
There isn’t a huge difference between USB4 and Thunderbolt 4, and all Thunderbolt 4 devices support USB4. While Thunderbolt 4 always has a full 40Gbps bandwidth, USB4 starts at 20Gbps, but can also reach 40Gbps. A USB4 port supports only one display, while Thunderbolt 4 can support two 4K displays. Learn about Thunderbolt 5, 4 and USB4.
- Mac mini M1 (from 2020)
- MacBook Air (from 2020)
- 13in MacBook Pro (from 2020)
- 14in MacBook Pro (from 2021)
- 16in MacBook Pro (from 2021)
- 24in iMac (from 2021)
- Mac Studio (from 2022)
Most up to date is Thunderbolt 5, which is backwards compatible all the way back to plain USB-C. The two external displays from one cable limit remains except for Macs boasting an M5 Pro or M5 Max chip, which can support three or four displays respectively over one cable.
Simon Jary
Thunderbolt 1 or 2
Thunderbolt first appeared on Macs in around 2011, then in 2013 Apple introduced Thunderbolt 2. The Thunderbolt port looks the same as Mini DisplayPort (below) and is backwards-compatible with that port. If you see a Thunderbolt symbol besides what looks like a Mini DisplayPort, your Mac has a Thunderbolt port.
If your Mac is from 2011 to around 2016, chances are it offers Thunderbolt 1 or 2 rather than Mini DisplayPort, although the two are compatible.
Mini DisplayPort

Mini DisplayPort was announced by Apple towards the end of 2008. With an adapter the Mini DisplayPort can drive displays that feature VGA, DVI or HDMI interfaces.
For more information about ports, here’s a rundown of some of Apple’s different port types.
Which port does my display have?
Now that you’ve identified which port your Mac has, you need to check the port on your display, we run through all the options below. You also need to confirm one more thing:
Is the port male or female?
You need to check whether the connection on the back of your display has “female” ( a port) or “male” (a connector) endpoints. The NEC MyltiSync E243WMI we used had a female connection, for example, so we needed to make sure that the adaptor we bought had male endpoints.
HDMI
HDMI 2.1 brings support for resolutions up to 8k and higher. It supports up to 32 channels of audio from version 2.0. HDMI is the most common connector you’ll find on the back of a TV. Want to use an 8K monitor? Read How to connect an 8K display to your Mac.
As we noted above, some Macs ship with an HDMI port—in which case you just need an HDMI-to-HDMI cable to connect your display to your Mac. If your Mac doesn’t have an HDMI port then you just need an adapter or adapter cable: for example, a USB-C-to-HDMI cable or an adapter; see our reviews of the best USB-C adapters for Mac.
DisplayPort
DisplayPort brings support for resolutions up to 16K and higher (DisplayPort 2.1 and later), although the Mac is limited to 8K at this time. It supports up to 32 channels of audio from version 1.4.
DisplayPort was designed to replace older standards like VGA and DVI (see below) and support high resolutions. It is regarded as superior to HDMI for gaming and multi-monitor setups as it offers higher bandwidth and refresh rates, plus daisy-chaining.
No Macs ship with DisplayPort port, so you’ll need to get a USB-C-to-DisplayPort cable to connect the display to your Mac, or an adapter.

Foundry
Thunderbolt, USB-C or USB4
Modern monitors are likely to feature USB-C ports rather than Thunderbolt ports, although Thunderbolt is faster and can take more power. USB-equipped displays are likely to be cheaper than Thunderbolt options, too.
Thunderbolt is closely related to DisplayPort (see above) as it tunnels DisplayPort signals alongside data and power over a single cable, allowing a Thunderbolt port to natively drive a DP monitor while also managing data/power.
Because Thunderbolt and USB-C ports are identical, if your Mac has one, you will be able to use a USB-C cable to connect the monitor to your Mac but make sure it supports at least 5Gbps of data—many USB-C cables are just for charging and wimp out at just 480Mbps data transfer. Find the best USB-C data/monitor cable in our roundup.
Thunderbolt 1 or 2
If you purchased the Apple Thunderbolt display, which was discontinued in 2016, then your monitor has a Thunderbolt 2 port, as seen above.
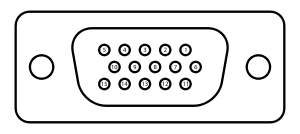
VGA
A VGA (Video Graphics Array) connector requires a three-row 15-pin DE-15 connector. VGA connectors transmit analog signals.
A few Macs had a VGA connector, but none this century. You can buy a USB-C to VGA connector if your monitor is old enough to require one.
Old CRT (Cathode Ray Tube) monitors were VGA but there are still some flat displays that use VGA—they just convert the VGA connector’s analog signal back to digital. This conversion from digital to analog and back again can cause degradation of video quality. VGA will carry HD video but only analogue audio.
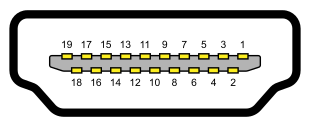
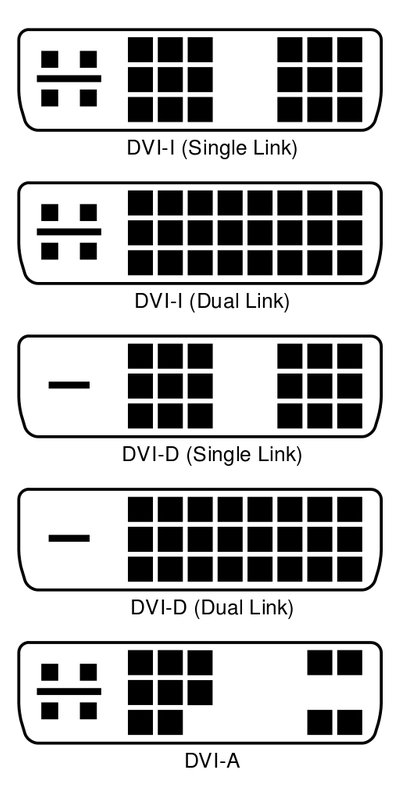
DVI
DVI (Digital Visual Interface) offers a higher-quality signal than VGA because it’s a digital signal. You will see a marked difference when looking at HD video as compared to VGA.
A DVI connector has the potential for 24 pins, depending on whether it’s DVI-A, DVI-D or DVI-I, there are different connectors with a different number of pins in use. There is also a long pin which may be surrounded by four other pins (which are required for audio in older models).
Mini DisplayPort
If you still have one of Apple’s LED Cinema Displays, introduced back in 1999 and replaced in 2011 by the Thunderbolt display, your display has a Mini DisplayPort connection, as seen above.
Best cable, adapter or dongle for connecting a Mac to a monitor
Now that you have established which port your Mac and display have, you will need to find a cable to connect your Mac to the monitor. This cable doesn’t need to be from Apple, but it will need to have the right connections and be capable of at least 5Gbps data transfer. Another thing that may be important to you is the length of the cable. It’s no good trying to hook up your Mac to a monitor if the cable or adapter is too short. Remember you will need enough cable to go from the back of the display to the port on the Mac.
Read our recommendations of the best cables and adaptors for connecting a display to your Mac.
If the number of ports on your Mac is limited, and if you want to connect an additional two 4K displays to your Mac, you will benefit from using either a docking station or hub that will give you more ports, such as USB, Ethernet and card readers. We have a number of recommendations in the best docking stations for MacBooks.
Of course a cable doesn’t have to cost that much. If you don’t want to buy a dock, you need to work with the ports you have available. Depending on what port you have on your Mac and your display, we recommend the following:
HDMI to HDMI display
As we noted above, some Macs ship with an HDMI port in which case you can use an HDMI cable to connect an HDMI display to your Mac, such as this Anker HDMI-to-HDMI cable
USB-C/Thunderbolt to USB-C display
You can buy Apple’s own USB-C/Thunderbolt 3 cable if you have a Thunderbolt 3-compatible monitor. It’s £39 in the UK Apple Store and $39 in the US Apple Store.
Or you can save some money and buy the Cable Matters 20Gbps USB C-to-USB C Monitor Cable that is all you should need to connect a Mac to a USB-C monitor.
USB-C/Thunderbolt to HDMI display
Among other things, the Apple USB-C Digital AV Multiport Adapter ($69/£69) lets you connect a Thunderbolt-equipped Mac to an HDMI display. You will still need a separate HDMI-to-HDMI cable (such as this one from Anker) to do so. See our list of USB-C adapters for more options.
If you have a standard HDMI-compatible monitor, the Six-foot USB-C/Thunderbolt 3 to HDMI cable from Uni is an affordable solution.
USB-C to VGA display
Apple’s USB-C VGA Multiport Adapter lets you connect to a VGA display or projector. This is an analogue connection so it will not support HDCP (High-bandwidth Digital Content Protection) content. This would include the streaming HD movies.
The USB-C VGA Multiport Adapter is available for $69 on the Apple US store or £69 on the Apple UK store.
This is a cheaper USB-C to VGA connector option.
USB-C to DVI display
Apple doesn’t sell one, but you’ll be able to find a USB-C to DVI adapter on Amazon, such as this Benfei USB-C to DVI cable ($11.85 Amazon or £12.99 on Amazon UK).
USB-C to Mini DisplayPort display
Apple doesn’t make a USB-C to Mini DisplayPort adapter, so you won’t be able to connect a 2016 or later MacBook Pro to the old Apple Cinema Display, or any other monitor that uses a Mini Display Port. This JSaux USB-C to MiniDP Adapter is an affordable solution.
Mini DisplayPort to HDMI display
Apple does not manufacture a Mini DisplayPort to HDMI adapter, so try the Belkin 4K Mini DisplayPort to HDMI Adapter.
Thunderbolt (USB-C) to Thunderbolt 2 Adapter
Apple’s Thunderbolt 3 (USB-C) to Thunderbolt 2 Adapter can be used to connect to a Thunderbolt display to a new Mac. It costs$49 from the Apple US Store or £49 from the Apple UK Store.
How to connect a second or third monitor to a Mac
The simplest way of adding a second or third monitor to a Mac is to use a hub or docking station. Depending on its number of video or Thunderbolt/USB-C ports you should be able to easily add one or two displays via a single connection to the dock or hub. See our reviews of the best USB-C hubs for Mac and best Mac docking stations.
Most Macs are limited to a maximum of two external monitors via a dock; the exceptions are three with a MacBook Pro with an M5 Pro chip or four with an M5 Max chip. Below we list each Mac’s support for external displays without a dock.
Neo: One external display with up to 4K resolution at 60Hz. Use a DisplayLink dock for more than one monitor on the MacBook Neo.
M1/M2: One external display with up to 6K resolution at 60Hz. Use a DisplayLink dock for more than one monitor on these MacBooks.
M3: Supports up to two external displays over a single Thunderbolt port, one with up to 6K resolution at 60Hz and one at 5K/60Hz when the MacBook lid is closed. Use a DisplayLink dock for more than one monitor on these MacBooks (with MacBook lid open) or more than two monitors.
M4: Supports up to two external displays over a single Thunderbolt port, one with up to 6K resolution at 60Hz and one at 5K/60Hz. Use a DisplayLink dock for more than two monitors on these MacBooks.
M5: Supports up to two external displays over a single Thunderbolt port, one with up to 6K resolution at 60Hz and one at 6K/60Hz. Use a DisplayLink dock for more than two monitors on these MacBooks.
M1/M2/M3/M4 Pro: Up to two external displays with up to 6K resolution at 60Hz over Thunderbolt, or one external display with up to 6K resolution at 60Hz over Thunderbolt and one external display with up to 4K resolution at 144Hz over HDMI. Or one external display supported at 8K resolution at 60Hz or one external display at 4K resolution at 240Hz over HDMI. Use a DisplayLink dock for more than two monitors on these MacBooks.
M1/M2/M3/M4 Max: Up to four external displays: Up to three external displays with 6K resolution at 60Hz over Thunderbolt and one external display with up to 4K resolution at 144Hz over HDMI. Up to three external displays: Up to two external displays with 6K resolution at 60Hz over Thunderbolt and one external display with up to 8K resolution at 60Hz or one external display with 4K resolution at 240Hz over HDMI.
M5 Pro: Supports up to three external displays over a single Thunderbolt port. Up to three displays up to a native resolution of 6K (6144 x 3456) at 60Hz or 4K (3840 x 2160) at 144Hz over Thunderbolt or HDMI. Or one external display supported at 8K (7680 x 4320) at 60Hz, 5K (5120 x 2880) at 120Hz, or 4K (3840 x 2160) at 240Hz, plus a second display up to a native resolution of 5K (5120 x 2880) at 120Hz or 4K (3840 x 2160) at 200Hz over Thunderbolt or HDMI.
M5 Max: Supports up to four external displays over a single Thunderbolt port. Up to four displays up to a native resolution of 6K (6144 x 3456) at 60Hz or 4K (3840 x 2160) at 144Hz over Thunderbolt or HDMI. Two displays up to a native resolution of 8K (7680 x 4320) at 60Hz, 5K (5120 x 2880) at 120Hz, or 4K (3840 x 2160) at 240Hz over Thunderbolt or HDMI.
Troubleshooting problems with a second display
There are a number of issues you may experience with your display setup. Here we address some of them. Let us know of any further solutions or problems.
Mac not detecting the monitor
When you connect your display and your Mac the display should automatically be detected. But what should you do if it isn’t?
If your Mac isn’t working with your monitor there are a few things to try:
- Check the cable—make sure it is properly connected.
- Make sure the monitor is plugged in.
- Make sure your software is up to date.
If the above don’t work, try these steps:
- Connect your monitor and Mac and open System Preferences > Displays.
- Press the Alt/Option key: This should make the Detect Displays button appear.
- Click on Detect Displays: This should cause your Mac to see the external monitor.
Still not having any luck? There is one other reason that could stop your Mac working with an external display: In the past Apple has made changes to macOS that have stopped some third-party adapters working with extra displays.
External display is not working with a Mini DisplayPort adapter
If your adapter is not made by Apple, that might just be the issue here. Prior to macOS Sierra it was possible to use a third-party Mini DisplayPort to DVI adapter with a Mac, but when Sierra launched in 2016 Mac users who were reliant on that setup found their monitors stopped working with their Mac.
The only solution if this is the case is to purchase an Apple adapter like one of those listed above.
If you have an Apple adapter and your external display isn’t working, try the following:
- Disconnect your adapter for a few seconds.
- Reconnect it and see if the issue persists.
- Disconnect the adapter again and power off the monitor.
- If it’s still not working, connect the cable again and power off the display.
- If when you turn the display back on it’s still not working, click on the Apple logo and choose Sleep.
- Wait a few minutes and then move your mouse or tap your keyboard to wake your Mac.
- If that doesn’t work, restart the computer.
- Try adjusting the display’s brightness or contrast just in case it’s turned down.
- Go to System Preferences > Display and try selecting a different resolution.
- If that still doesn’t work, try restarting your Mac in safe mode and then reset the display resolution to defaults.
- Another option is to reset the Mac’s NVRAM and SMC.
DVI adapter doesn’t fit in the connection
There are a few possible reasons why the Apple Mini DisplayPort to DVI adapter might not be compatible with your monitor.
There is more than one kind of DVI adapter and the likelihood is the one you have is different to the adapter you are using. For example, you may require space for four analog ports around the flat blade.
If your problem is that you have two female or two male connections then the solution is to buy a male-to-female adapter.
Cable too small between the two devices? You should be able to hook up your adapter to the screen via a third-party cable. Just make sure it has the correct port type.
iPad won’t work as second display
Thought you’d use an iPad as a second display with your Mac having installed macOS Catalina and found it doesn’t work? This is most likely because your iPad or Mac don’t support the Sidecar feature.
iPads that work with Sidecar include:
12.9-inch iPad Pro
11-inch iPad Pro
10.5-inch iPad Pro
9.7-inch iPad Pro
iPad (6th generation or later)
iPad (5th generation or later)
iPad mini (5th generation or later)
iPad mini 4 or later
iPad Air (3rd generation or later)
iPad Air 2 or later
Macs that work with Sidecar include:
MacBook Pro (2016 or later)
MacBook (2016 or later)
MacBook Air (2018 or later)
iMac (2016 or later, as well as iMac 5K, 27-inch, late 2015)
iMac Pro
Mac mini (2018 or later)
Mac Pro (2019 or later)
We have more information about using an iPad as a second screen for your Mac here. Plus, we run through What Universal Control is and how Universal Control works separately.
If you are wanting to use a second display with your Mac and not have your Mac’s screen on read: How to turn a Mac’s screen off.


