Sometimes, you need to turn a piece of paper into a digital file. Maybe you need to include a receipt, registration, or other form of proof in an online form. Or, you want to keep copies of your important documents in the cloud, so they’re always accessible and safe from being lost or destroyed. Such documents are often digitized as Portable Document Format files (or PDFs).
It used to be that you needed to use either dedicated hardware or a third-party iPhone app to take a photo of a document and convert it to PDF. That is no longer the case: Apple includes a very handy document scanner in the iPhone’s Notes and Files apps, and it does a surprisingly good job of capturing most documents and converting them to PDF. Because it’s not very obvious, you’d be forgiven for not even knowing it exists.
Here’s how you scan documents using an iPhone. We also cover how to convert the scan into a PDF and how to autofill the PDF on an iPhone.
We also have a round up of the best free PDF editors for Mac and explain How to edit a PDF on a Mac. You may also be interested How to create a PDF on an iPhone.
- Time to complete: 5 minutes
- Tools required: iPhone with iOS 11 or later
- Cost: 0
How to scan a document on iPhone using Notes
Foundry
- Open the Notes app.
- Create a new Note or select an existing one.
- Tap the camera button and select Scan Documents.
- Hold your iPhone over your document until it is highlighted. Try to get it as level and square as possible.
- Either hold your iPhone (or iPad) still until the scan captures automatically or press the shutter.
- Depending on whether you are happy or not choose Retake or Keep Scan.
- Unhappy with the scan? There are two modes: if you use Auto (the word Auto appears in the upper-right corner), Notes captures a page whenever it detects a document. Most of the time the results are pretty accurate, but if they aren’t good enough you can switch to Manual by tapping Auto in the top right, then you can drag the corners to adjust the scan until you are happy. Keystoning will be applied. (Keystoning is the effect of a rectangle appearing to be a different shape when not captured—or projected as with a slide projector—absolutely squarely.)
- Once you are happy with the scan, tap Keep Scan.
- Continue scanning until all pages are captured, or tap Save.
- Notes will attempt to extract some text at the top of the document to use as its title.
How to turn a scan into a PDF on iPhone
Foundry
The method above allows you to scan a document into Notes, which is useful if you want to store your scans in Notes. But what if you’d rather store it as a PDF?
Luckily if you save the scan it will automatically save as a PDF.
- Open a Note containing a scanned document.
- Beside the scanned document tap on the arrow.
- Choose Save to Files.
- Select a folder within Files in which to save a PDF of the scan.
- Give the file a name (and tags if you wish) at the bottom of the screen.
This will save the scan as a PDF.
How to scan a PDF on iPhone

Foundry
You don’t have to save your scan in Notes, you can also scan directly into Files, where your document will automatically be saved as a PDF.
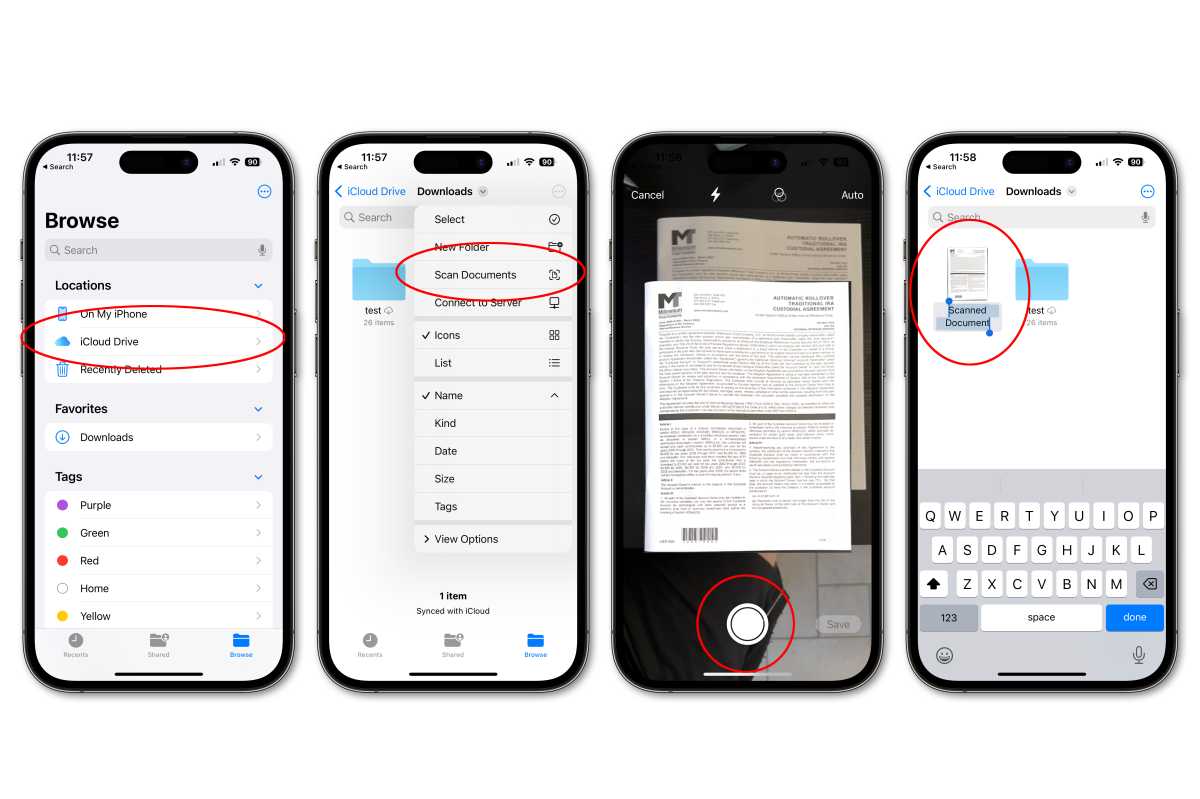
- Open Files on your iPhone (or iPad).
- Choose a location to save your scan.
- Tap the more button (…) in the upper right, and choose Scan Documents.
- Line up your document and tap the shutter, or hold the iPhone still to automatically capture the image. If you use the shutter, you can drag the corners to adjust.
- Once you are happy tap Keep Scan.
- Add additional scans if required and tap Save when you’re done.
- The scan will be saved in your chosen location as a PDF, and likely named “Scanned Document.” The name will be highlighted so you can easily change it.
How to fill in a PDF on iPhone

Foundry
Now that you have your PDF scanned onto your iPhone it is easy to fill it in. In fact, your iPhone can even use AutoFill to complete some parts of the PDF.
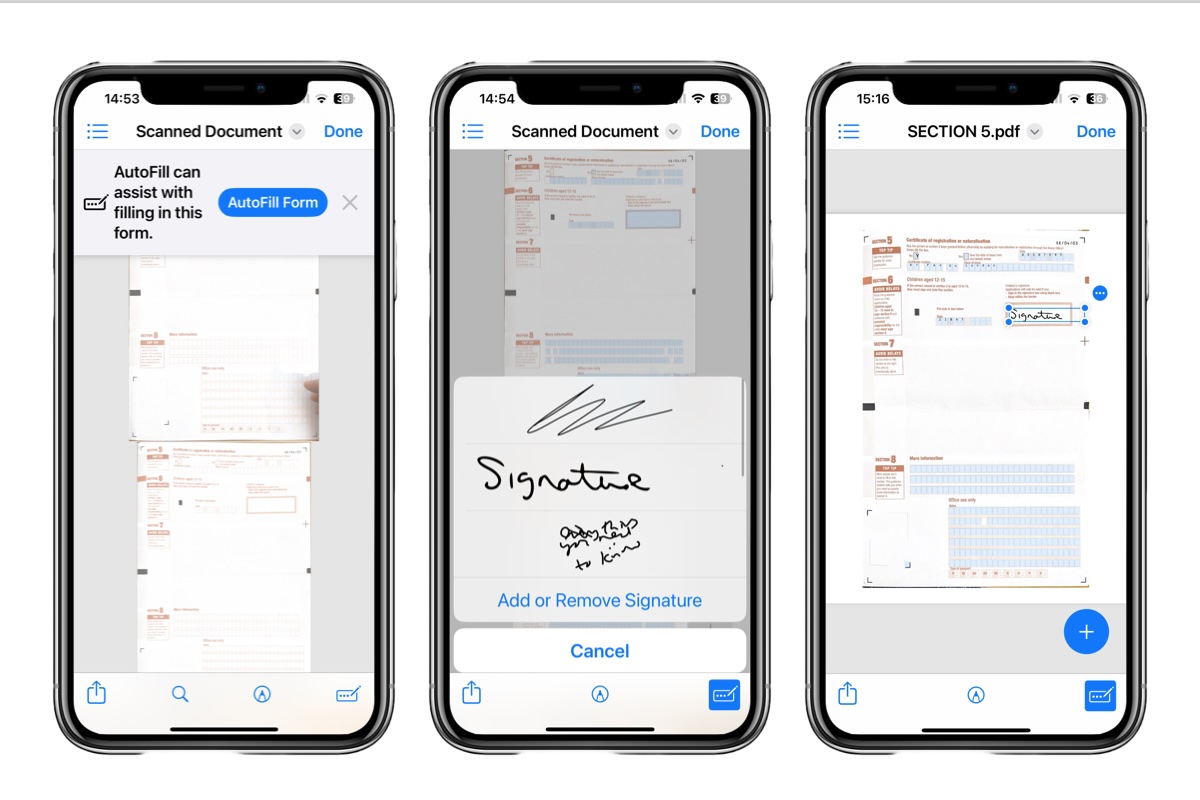
- Once scanned the PDF will invite you to AutoFill Form, this iOS 17 feature means that details like your name, address and other information can be automatically filled in (as long as you have previously added it to your Contact Card. See how to autofill passwords, names and addresses.
- You can then fill in details by tapping on the fields. To add text tap on the pencil icon at the bottom right.
- When you tap in the signature box the software will recognize that a signature is required and you can easily add a signature if you have one saved, or you can add or remove a signature.
You might find it easier to fill in a PDF on a Mac, read: How to edit a PDF on Mac.


